Various ways to find routes (if equipped)
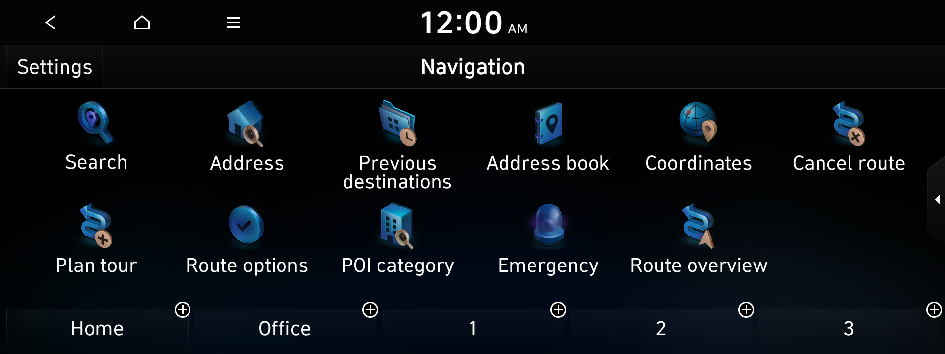
On the Navigation menu, you can set the destination by using various searches, such as entering the location data or selecting from recent destinations or categorised places.
Perform any of the following methods:
- • On the All menus screen, press Navigation.
- • On the control panel, press the button.
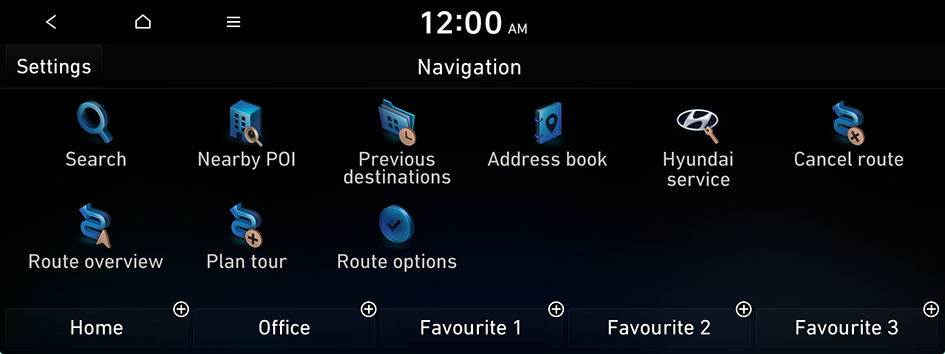
Type1
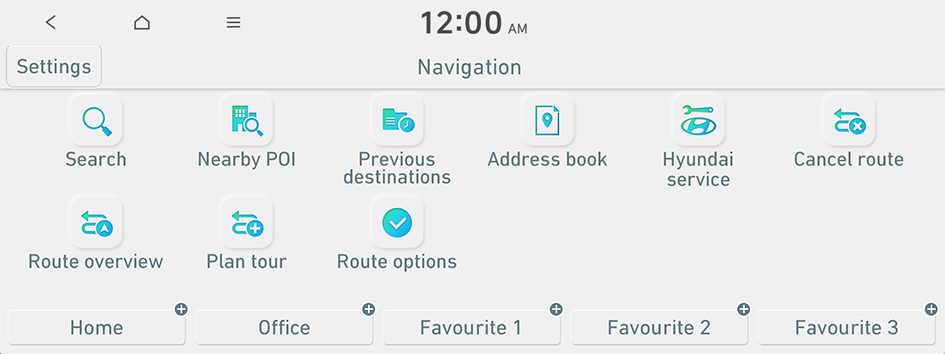
Type2
- Available icons and their arrangement may differ depending on the vehicle model and specifications.
- If the vehicle is type 2, it is possible to change the graphic theme to white or black. ▶ See "Graphic themes (if equipped)."
Searching by keyword
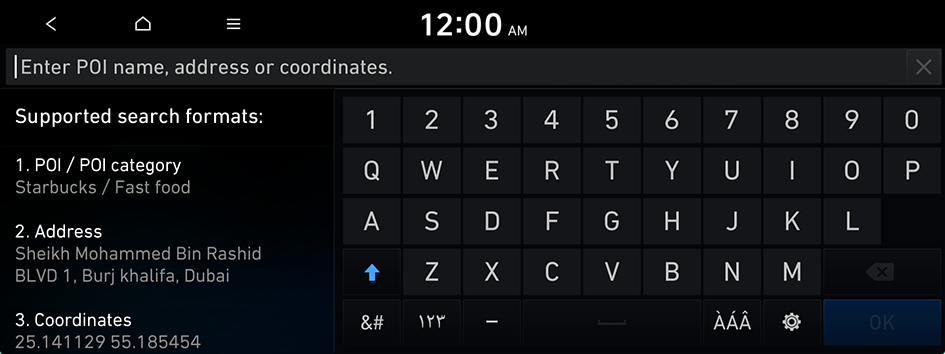
Search for a location by entering various types of keywords such as place name, coordinates, and address.
- On the Navigation screen, press Search.
Type1
Type2
- Available icons and their arrangement may differ depending on the vehicle model and specifications.
- If the vehicle is type 2, it is possible to change the graphic theme to white or black. ▶ See "Graphic themes (if equipped)."
- Enter the location data such as place name, address, or coordinates and then press OK.
- To access the online user's manual on the Search screen, press
 ▶ Manual and then scan the displayed QR code.
 - The screen may differ depending on the vehicle model and specifications.
- To access the online user's manual on the Search screen, press
- Select a location from the search result list.
- You can see the sites in the list on the preview screen.
- To sort the search results in a different order, press on the attribute to toggle between options.
- The Add tourpoint menu appears when a destination has been set.
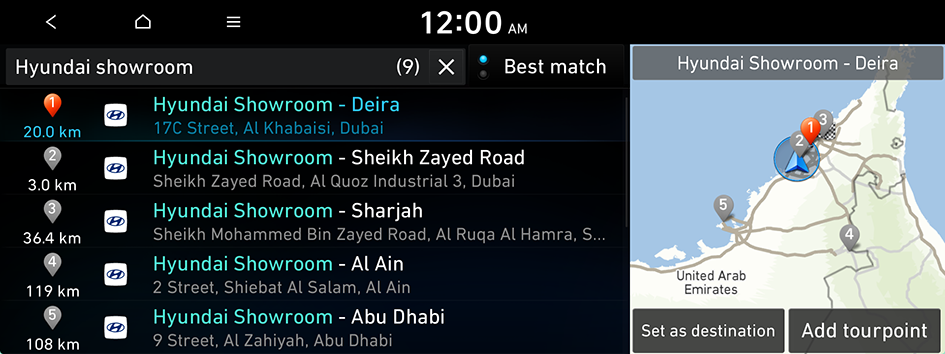
- Check the location of the destination and then press Set as destination.
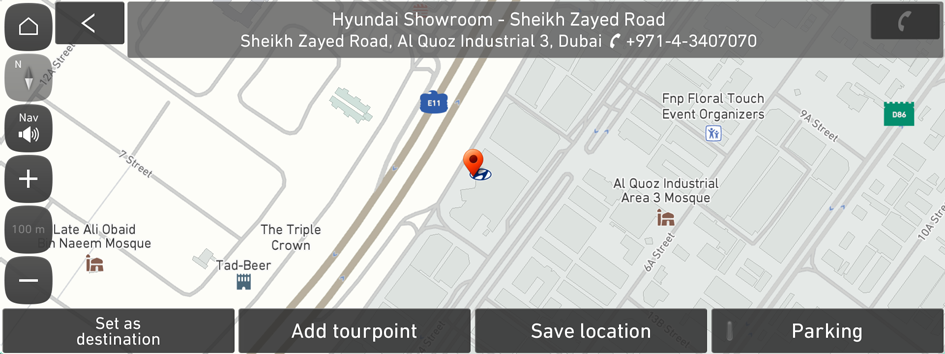
- If you press Parking at the bottom right of the screen, the map screen displays the location icon of the parking lot.
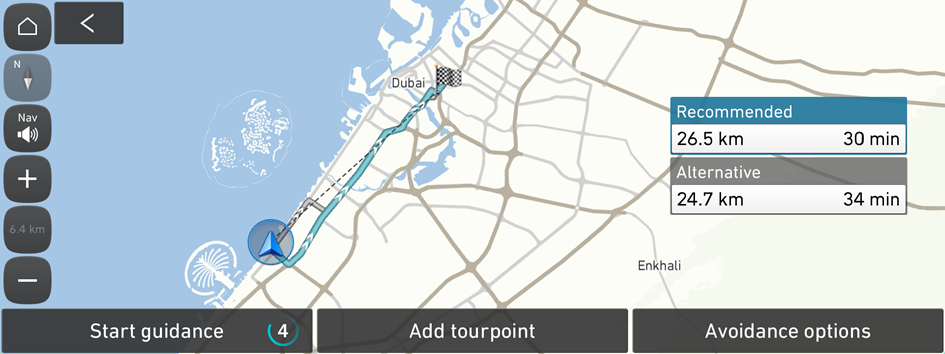
- Select a route and press Start guidance.
- The screen may differ depending on the vehicle model and specifications.
Searching by address (if equipped)
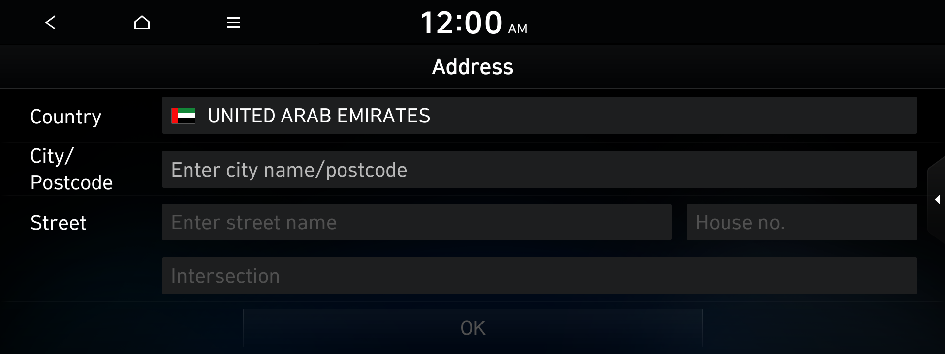
- On the Navigation screen, press Address.
- Available icons and their arrangement may differ depending on the vehicle model and specifications.
- Enter the country name, city name, post code, and street name, and then press OK.
- To access the online user's manual on the Address screen, press ▶ Manual and then scan the displayed QR code.
- To access the online user's manual on the Address screen, press
- Check the location of the destination and then press Set as destination.
- If you press Parking at the bottom right of the screen, the map screen displays the location icon of the parking lot.
- Select a route and press Start guidance.
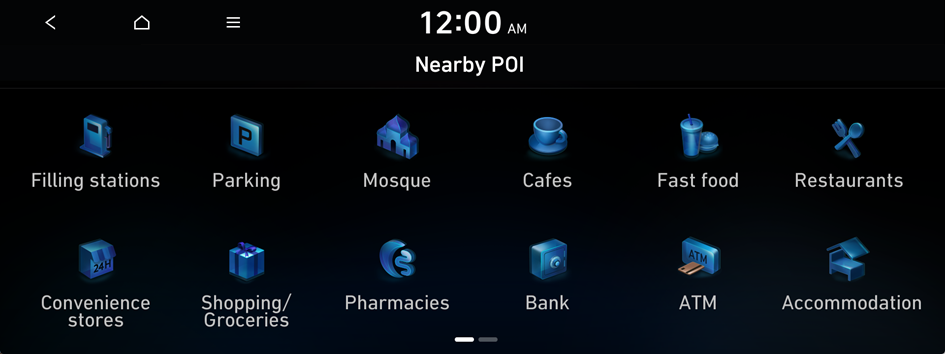
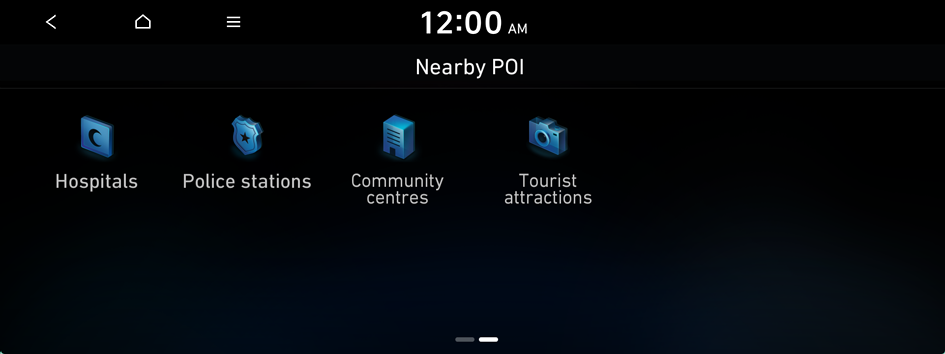
Searching for nearby POI(Points of Interest)
You can set a destination after searching the nearby points of interest by category.
- On the Navigation screen, press Nearby POI.
Type1
Type2
- Available icons and their arrangement may differ depending on the vehicle model and specifications.
- If the vehicle is type 2, it is possible to change the graphic theme to white or black. ▶ See "Graphic themes (if equipped)."
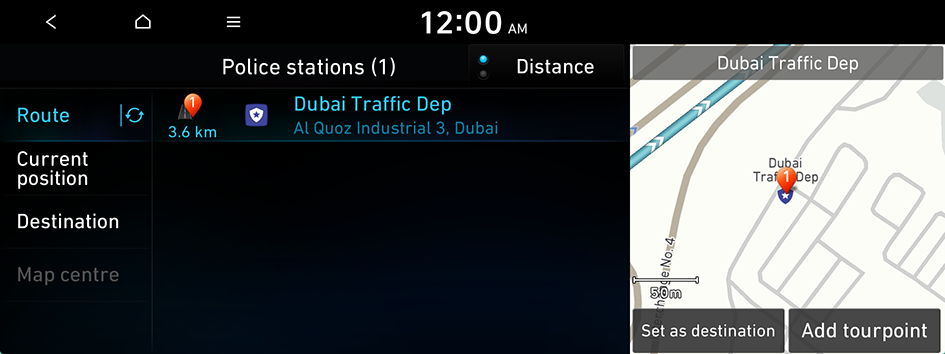
- Select a desired point according to the instructions.
- To access the online user's manual on the Nearby POI screen, press ▶ Manual and then scan the displayed QR code.
- The screen may differ depending on the vehicle model and specifications.
- To access the online user's manual on the Nearby POI screen, press
- Select a destination from the search result.
- You can see the sites in the list on the preview screen.
- To sort the search results in a different order, press on the attribute to toggle between options.

- Check the location of the destination and then press Set as destination.
- Select a route and press Start guidance.
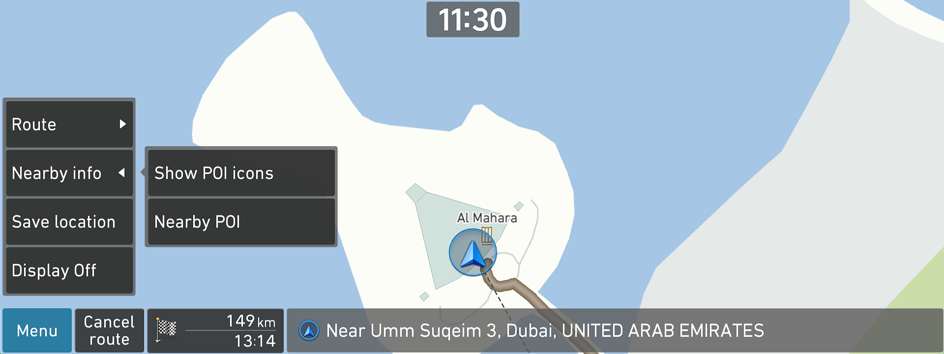
- To change the type of surrounding POIs on the map, move to the map screen and then press
 ▶ Nearby info ▶ Show POI icons.
 - To search for nearby points of interest during a guidance, press ▶ Nearby info ▶ Nearby POI.
- The screen may differ depending on the vehicle model and specifications.
- To change the type of surrounding POIs on the map, move to the map screen and then press
Searching from previous destinations
You can set a destination by selecting from the searched ones.
- On the Navigation screen, press Previous destinations.
The previous destinations appear in the list.
Type1
Type2
- Available icons and their arrangement may differ depending on the vehicle model and specifications.
- If the vehicle is type 2, it is possible to change the graphic theme to white or black. ▶ See "Graphic themes (if equipped)."
- Select the desired destination from the list.
- You can see the sites in the list on the preview screen.
- To sort the search results in a different order, press on the attribute to toggle between options.
- To access the online user's manual on the Previous destinations screen, press ▶ Manual and then scan the displayed QR code.
- The Add tourpoint menu appears when a destination has been set.

- Check the location of the destination and then press Set as destination.
- If you press Parking at the bottom right of the screen, the map screen displays the location icon of the parking lot.
- Select a route and press Start guidance.
Deleting a previous destination
- On the Previous destinations screen, press Delete.
- Select the destination(s) to delete and press Delete.
You can delete the selected place(s) or all places.
Searching for Hyundai service
You can easily search for service centres or service stations.
- On the Navigation screen, press Hyundai service.
Type1
Type2
- Available icons and their arrangement may differ depending on the vehicle model and specifications.
- If the vehicle is type 2, it is possible to change the graphic theme to white or black. ▶ See "Graphic themes (if equipped)."
- Select a Hyundai service from the list.
- To sort the search results in a different order, press on the attribute to toggle between options.
- To access the online user's manual on the Hyundai service screen, press ▶ Manual and then scan the displayed QR code.
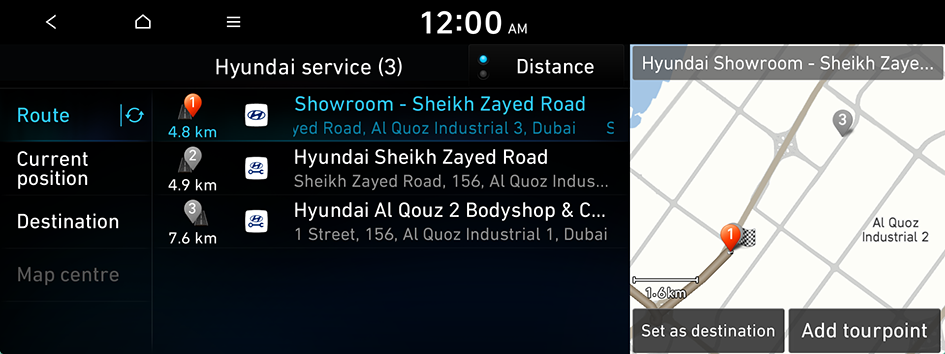
- Check the location of the destination and then press Set as destination.
- If you press Parking at the bottom right of the screen, the map screen displays the location icon of the parking lot.
- Select a route and press Start guidance.
Editing the route
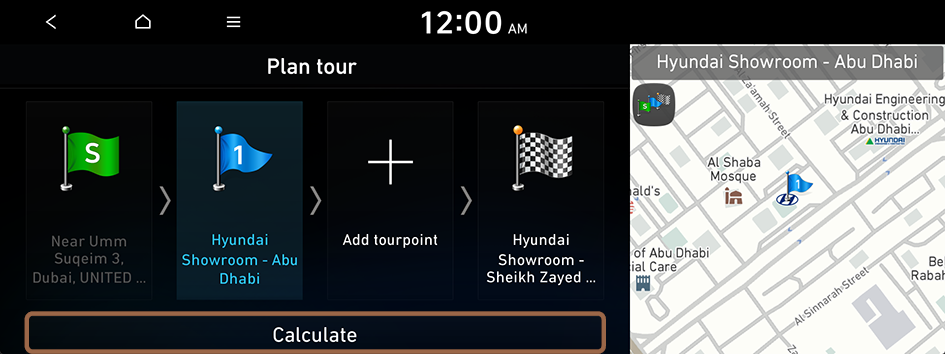
You can edit the tourpoint on the way to the destination. You can add up to two tourpoints.
Setting a tourpoint
You can search for the desired place and set it as a tourpoint.
- On the Navigation screen, press the desired search method to search for a tourpoint.
Type1
Type2
- Available icons and their arrangement may differ depending on the vehicle model and specifications.
- For more information about the tourpoint search: ▶ see "Searching by keyword", "Searching from previous destinations", "Searching for nearby POI(Points of Interest)", "Searching for emergency services."
- If the vehicle is type 2, it is possible to change the graphic theme to white or black. ▶ See "Graphic themes (if equipped)."
- On the map for a search, press Add tourpoint.
The selected tourpoint is added to the route.
- If you press Parking at the bottom right of the screen, the map screen displays the location icon of the parking lot.
- After adding tourpoints, press Calculate.
- To access the online user's manual on the Plan tour screen, press ▶ Manual and then scan the displayed QR code.
- To access the online user's manual on the Plan tour screen, press
- Select the updated route and then press Start guidance.
Changing the order of tourpoints
You can change the order of tourpoint on the route.
- On the Navigation screen, press Plan tour.
- Select a tourpoint to change the order and then press Change order.
- To change the order of tourpoints, press Change order, then drag it to reposition.
- To add another tourpoint on the Plan tour screen, press Add tourpoint.
- To see tourpoint on the map, press tourpoint name ▶ Show map.
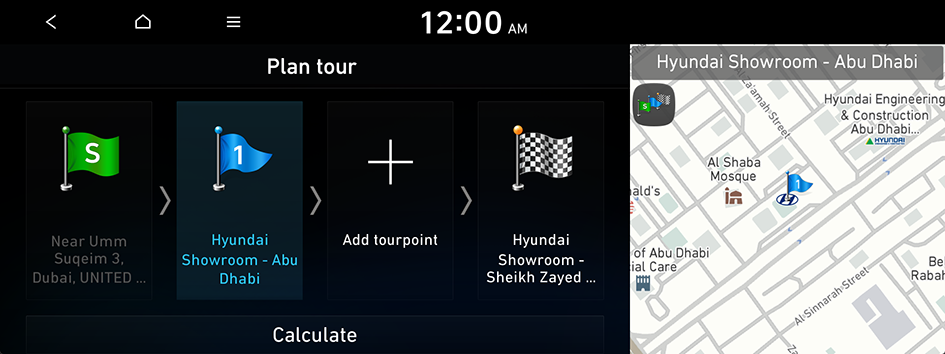
- After editing the route, press Calculate.
- Select the updated route and then press Start guidance.
Deleting a tourpoint
You can delete a tourpoint from the route.
- On the Navigation screen, press Plan tour.
- Select a tourpoint to delete from the route and then press Delete.

- The screen may differ depending on the vehicle model and specifications.
- To search the route again after removing the tourpoint, press Calculate.
- Select the updated route and then press Start guidance.
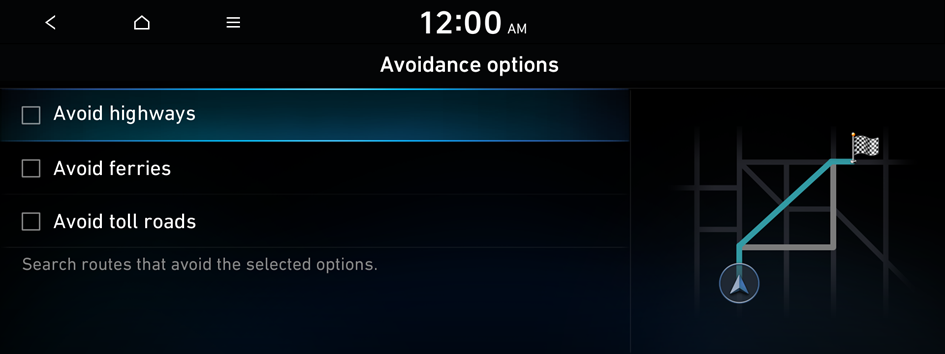
Changing the route search option
You can change the route search criteria to resume routing.
- On the Navigation screen, press Route options.
Type1
Type2
- Available icons and their arrangement may differ depending on the vehicle model and specifications.
- If the vehicle is type 2, it is possible to change the graphic theme to white or black. ▶ See "Graphic themes (if equipped)."
- Select a route and press Avoidance options.

- The screen may differ depending on the vehicle model and specifications.
- Select the avoid option.
- To access the online user's manual on the Avoidance options screen, press ▶ Manual and then scan the displayed QR code.
- Available options may differ depending on the vehicle model and specifications.
- To access the online user's manual on the Avoidance options screen, press
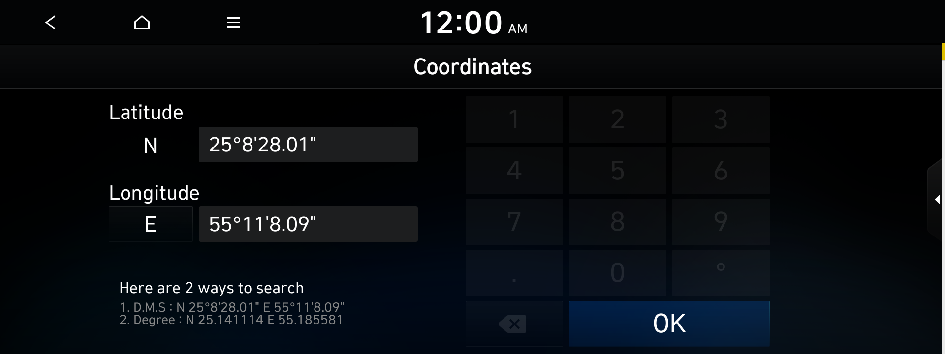
Finding the coordinates for longitude and latitude (if equipped)
You can set a destination by using the coordinates.
- On the Navigation screen, press Coordinates.

- Available icons and their arrangement may differ depending on the vehicle model and specifications.
- Enter the coordinates for longitude and latitude and then press OK.
- To access the online user's manual, on the Coordinates screen, press ▶ Manual and then scan the displayed QR code.
- To access the online user's manual, on the Coordinates screen, press
- Check the location of the destination and then press Set as destination.
- If you press Parking at the bottom right of the screen, the map screen displays the location icon of the parking lot.
- Select a route and press Start guidance.
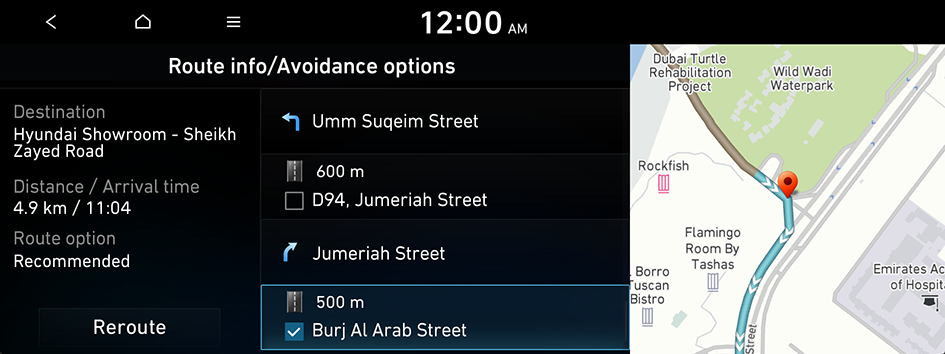
Avoiding specific zones
You can resume routing after excluding the specified roads such as congested roads and roads under construction.
- On the Navigation screen, press Route overview.
- Press Route info/Avoidance options.
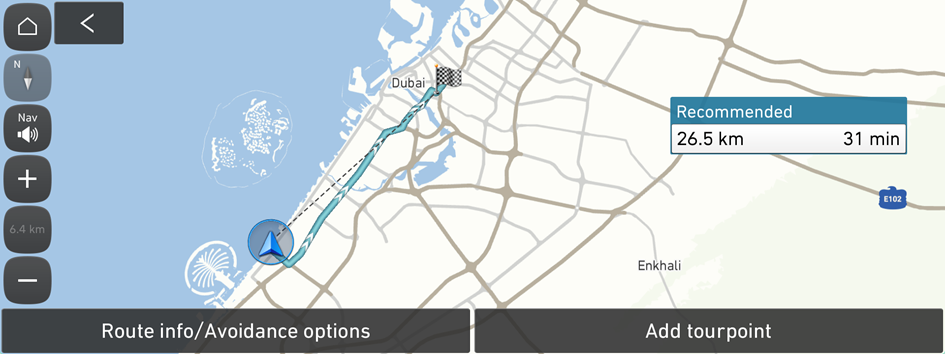
- The screen may differ depending on the vehicle model and specifications.
- Select the roads to avoid and press Reroute.
- To access the online user's manual on the Route info/Avoidance options screen, press ▶ Manual and then scan the displayed QR code.
- To access the online user's manual on the Route info/Avoidance options screen, press
- Press Yes.
- Select the updated route and then press Start guidance.
Searching for emergency services
- On the Navigation screen, press Nearby POI.
Type1
Type2
- Available icons and their arrangement may differ depending on the vehicle model and specifications.
- If the vehicle is type 2, it is possible to change the graphic theme to white or black. ▶ See "Graphic themes (if equipped)."
- Select the type of emergency service.
- The screen may differ depending on the vehicle model and specifications.
- Select a destination from the search result.
- Check the location of the destination and then press Set as destination.
- If you press Parking at the bottom right of the screen, the map screen displays the location icon of the parking lot.
- Select a route and press Start guidance.


