General information on Navigation use
-
Navigation operation while driving may cause traffic accidents by interfering with the driver's attention. Therefore, do not operate the device while driving.
-
Do not look at the screen continuously while driving. It may cause a traffic accident.
-
Be sure to drive in accordance with traffic regulations. Driving with only route guidance may violate traffic regulations and cause traffic accidents.
-
For safety reasons, some functions are limited while driving.
-
Information such as roads, place names, facilities, etc. may differ from actual information as it changes in real-time.
-
The route displayed for destination guidance is a reference route to the destination. It does not necessarily mean the shortest route, a route without congestion, or a route that you can travel quickly.
-
The vehicle's location may be displayed in a different location from its actual location. The vehicle's location display may deviate depending on the status of the vehicle, such as the state of receiving location data from satellites, driving location, and driving conditions. Additionally, if the map data is different from the actual road shape, such as a newly opened road, the vehicle's location may be displayed incorrectly. However, even if the vehicle's location on the map is off, if you continue to drive, the current location of the vehicle is automatically corrected using location and map data. However, in some cases, it may take several minutes.
-
This system displays the current location of the vehicle using location information from satellites, various sensors of the vehicle, and map data. However, if the vehicle is indoors or in a place with many high-rise buildings, or if it is difficult to receive accurate location data, such as under the influence of weather, the display of the vehicle's current location may differ from the actual location.
-
To understand the surrounding situation and prevent traffic accidents, adjust the volume appropriately when driving.
-
Voice guidance may differ from the actual situation, so drive in accordance with actual traffic regulations.
Roads, place names, facility information, and fares may differ from actual conditions depending on when the map data is updated.
The announced toll gate fees may differ from the actual according to the toll road operator's various discounts, surcharges, and fare adjustment policies.
-
Map data is continuously being collected to ensure that information is as accurate as possible. However, roads, place names, facility information, fares, etc. are changing in real-time and may differ from actual information. Please note this.
-
Basically, roads including sections less than 3 m wide are not updated in map data. If the road is recognized to include a section less than 3 m wide due to road construction or new measurements, it may be deleted when the map data is updated.
In the following cases, the vehicle's current location information may not be available.
-
When radio waves from satellites are blocked, such as in buildings or tunnels.
-
When radio waves are blocked, such as by placing an object on the top of the GPS antenna.
-
When satellites do not transmit radio waves.
Operating Navigation Screen

-
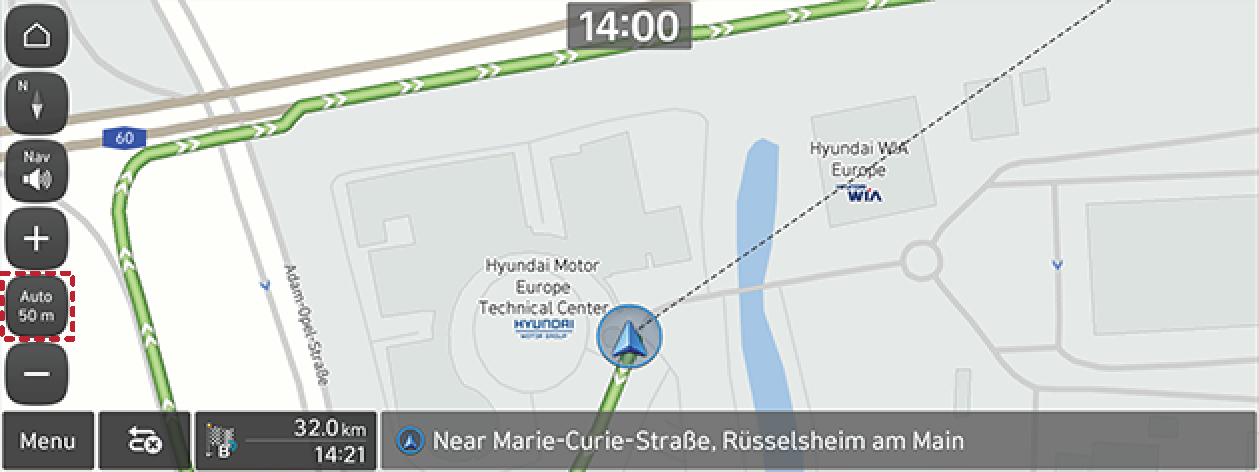
Clock display
Displays current time.
-
Home button
Moves to the home screen.
-
Map view button
Changes the map view perspective. Press [
 ], [
], [ ] or [
 ].
].-
(2D North up): The map always points north, regardless of the direction that the vehicle is moving.
-
(2D heading up): The map always displays the vehicle’s direction as proceeding towards the top of the screen.
-
(3D heading up): The map always displays the basic outline and details of the surrounding roads and general area.
-
-
Navigation volume button
Adjusts the navigation volume. For more details, refer to the “Navigation volume” part.
-
Map scale button
Displays the current map scale.
-
Press [
 ]/[
]/[ ] to switch the map view to fixed scale or automatic scale.
 -
Press [
 ] or [
 ] to adjust the map scale.
-
-
Menu button
The quick menu is displayed. For more details, refer to the “Quick menu” part.
-
Route guidance button
-
[
 ]: Moves to the search screen to search for the destination.
 -
[
 ]: Cancels the route guidance. Press and hold to stop the route guidance.
 -
Resume guidance: Resumes the route guidance when the set guidance is stopped.
-
-
Remaining distance, arriving or remaining time display
Displays the remaining distance and the expected time of arrival or the remaining time until arrival. Press to toggle between the arriving time and remaining time.
-
Current location and destination display
Displays current location and destination.
-
Vehicle location mark
Displays current vehicle location and direction.
-
Route guidance line
Displays the route guidance to the destination when a route is set.
-
Split screen
Press to open or close the split.
-
Pinch in/out to set the zoom level on the map screen.
-
Turn the controller left/right to set the zoom level on the map screen. (If equipped)
You can switch the map scale mode to scale fixed mode or auto scale mode.
Press [![]() ]/[
]/[![]() ] on the map screen.
] on the map screen.
|
Name |
Description |
|
Scale Fix [ |
Fixes the displayed scale. You can adjust the map scale manually. |
|
Auto Scale [ |
The map scale is set automatically according to the speed, road class and guidance distance. |
Press [![]() ] or [
] or [![]() ] to adjust the volume.
] to adjust the volume.
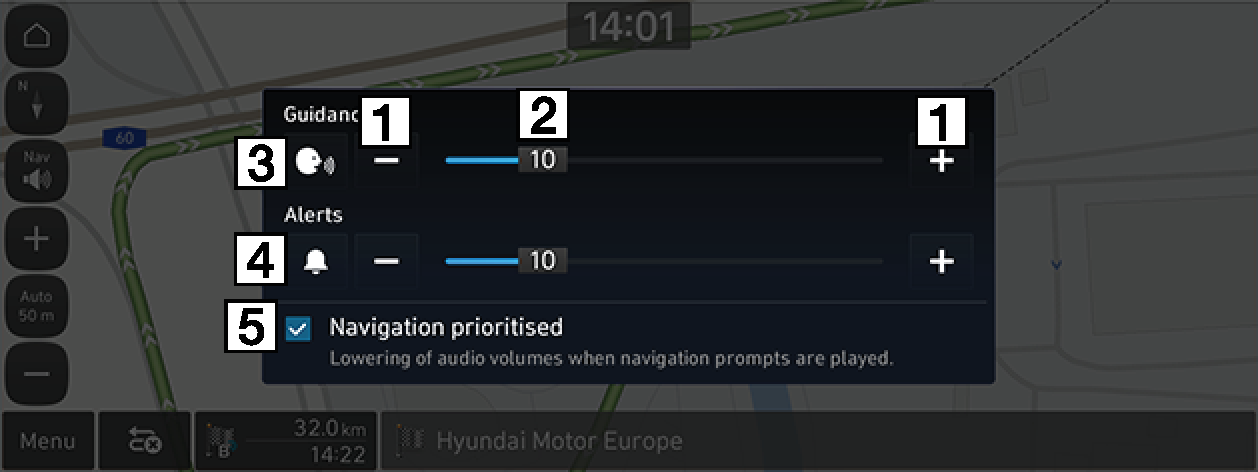
-
[
 ]/[
]/[ ]
]Adjust the navigation volume.
-
[
 ] Volume bar
Drag the volume control bar to adjust the volume.
-
[
 ]/[
]/[ ] Voice guidance on/off
Turn on or off the voice guidance.
-
[
 ]/[
]/[ ] Sound effect on/off
Turn on or off the sound effects.
-
Navigation prioritised
If checked, lowers all other audio volumes during playback of navigation prompts.
Press and hold the point on the map and move it to the desired direction and release it when the desired point is focused. The selected point will be centred on the screen and the scroll mark will be displayed. Information about the marked point and straight line distance from the current location will be displayed at the centre of the screen.
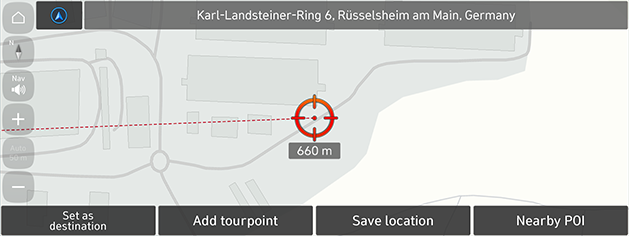
If a map area on the map screen is pressed, the map will continuously scroll in the corresponding direction until it is released.
After searching for a POI, the POI phone number information can be used to make a call to the POI facility.
-
Search for the desired POI. You can search by entering the keywords or using nearby POI, map, previous destinations list, etc.

-
Press [
 ] on the map screen.
 -
Bluetooth phone is used to make call.
-
Making a call is not possible if there is no telephone information for a POI or if there is no mobile phone connected through Bluetooth.
-
For more information on mobile phone authentication through Bluetooth or detailed information on conducting the search, refer to the “Pairing and connecting the unit and a Bluetooth phone” part.
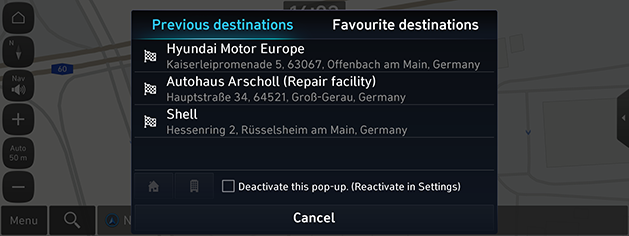
When the navigation is started without a destination, the locations you have previously visited and your favourite destinations are automatically displayed on the pop-up screen. On the pop-up screen, press the desired destination and route to start the guidance. The pop-up screen is available only when the destination is not set.
-
Previous destinations: Shows previous destinations.
-
Favourite destinations: Shows frequently visited destinations.
-
Deactivate this pop-up. (Reactivate in Settings): Select the check box to deactivate this pop-up screen.
-
Cancel: Closes the pop-up screen.
Press SETUP > Navigation > Automated features > Previous destinations settings > Display previous destinations when entering the map screen to set the previous destinations.
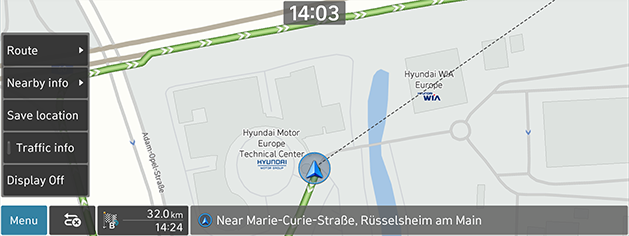
Quick menu
You can see the quick menu to move to the navigation menu quickly. Some items in the images may differ from the actual screen, according to the model, option and country.
-
Press Menu on the map screen.
-
Press the desired option.
-
Menu: Shows or hides the quick menu.
-
Route: Recalculates the route or sets the route options.
-
Nearby info: Sets the POI items to display on the map or find a facility by searching for POI near current location.
-
Save location: Adds the current location to Address book.
-
Traffic info: Sets whether to display traffic flow.
-
Display Off: Turns off the display. Touch the screen to turn it on again.
-
EV range(If equipped): Sets whether to display drivable distance.
-
The drivable distance may differ from the actual distance.