Turning on the radio
You can scan radio channels by using various options. Save your favorite channels to the presets list.
Perform any of the following methods:
- • On the All Menus screen, press Radio.
- • On the control panel, press the button.
- When multiple media are connected, press the or button once more and then press the desired media source from the Radio/Media selection window (if equipped).
Type1
Type2
- The displayed screen or menu items may differ, depending on the vehicle model and features. Check the screen type for your vehicle model and view the appropriate instructions.
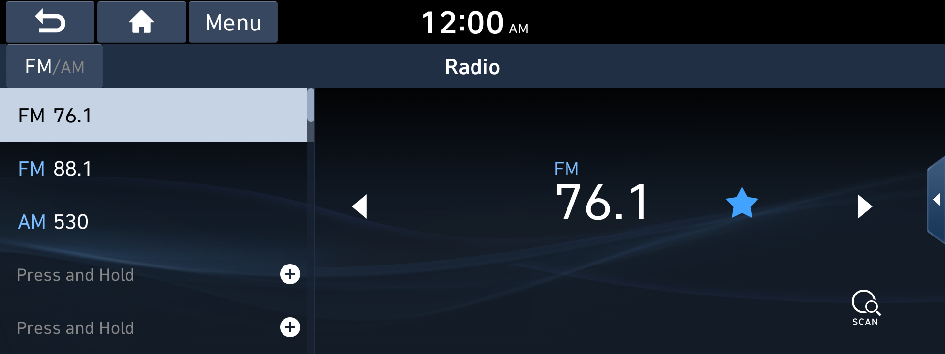
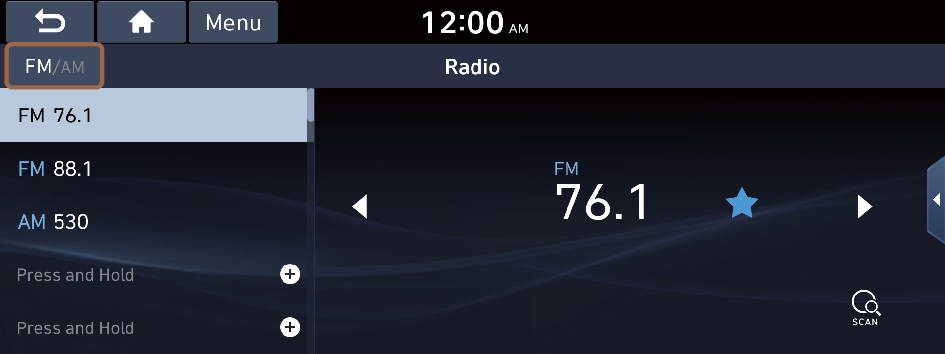
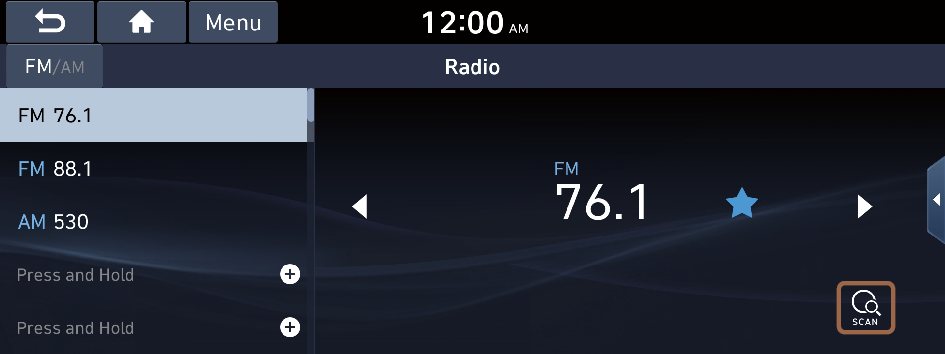
Radio screen (Type1)
The radio screen provides various functions while listening to radio broadcasts.
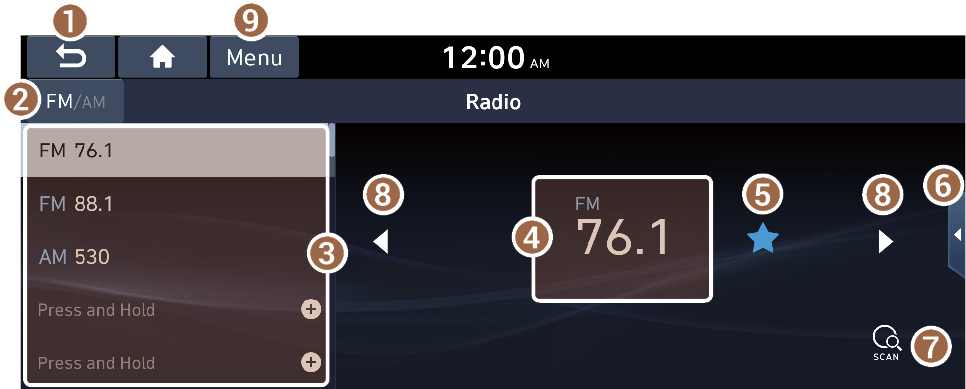
- Returns to the previous step.
- Can change the radio mode.
- Presets list
- Radio broadcast information
- You can delete or save the current frequency to the presets list. ▶ See "Saving radio channels (Type1)."
- Can turn on or off the split screen mode.
- You can listen to each radio channel for a short time and select the desired channel. ▶ See "Using the scan function."
- Can change the frequency. Shortly press to switch to the previous/next frequency, or press and hold to quickly change the frequency. When you release the
 or
or  button, the previous or next channel with good reception is automatically selected (if equipped).
 - The list of menu items appears.
- • Station List: Can see the list of available radio stations.
- • Auto-sort Presets: Used to sort the presets according to the order of radio station frequencies.
- • Reorder Presets: Can change the location of a channel by dragging on the presets list. ▶ See "Changing the order of registered channels."
- • Delete Presets: Can delete a registered channel from the presets list. ▶ See "Deleting a registered channel."
- • Set Number of Presets: Used to set the number of channels to display on the preset list (if equipped). ▶ See "Changing the number of channels to display on the preset list (if equipped)."
- • Sound Settings: Displays the system sound settings screen.
- • User's Manual on Web (QR Code): Displays the QR code that provides access to the online user manual for the system.
- • Split Screen: Can turn on or off the split screen mode.
- The screen may differ depending on the vehicle model and specifications.
- The broadcast station names and local information are displayed using GPS data. Those information may not appear when there is no GPS data received.
- The displayed broadcast station names may not match the actual ones.

Warning
Driving while distracted can result in a loss of vehicle control that may lead to an accident, severe bodily injury, or death. The driver's primary responsibility is the safe and legal operation of the vehicle, and the use of any vehicle systems, including the touch screen and steering wheel controls, which take the driver's eyes, attention, and focus away from the safe operation of the vehicle, or which are not permissible by law, should never be used during the operation of the vehicle.
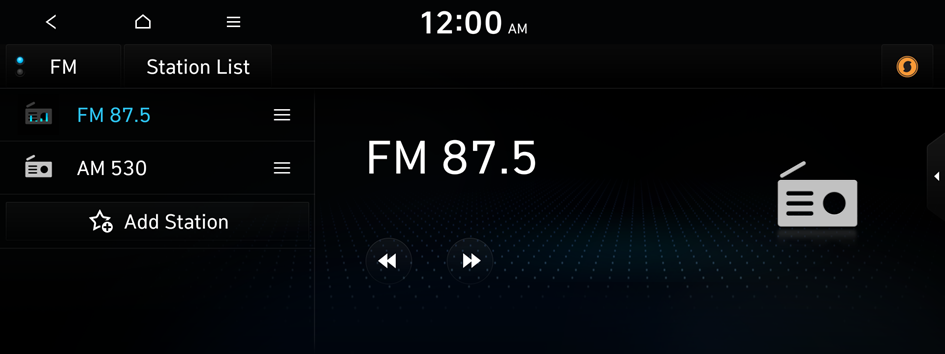
Radio screen (Type2)
The radio screen provides various functions while listening to radio broadcasts.

- Can change the radio mode.
- Can see the list of available radio stations.
- Presets list
- Press and drag
 next the channel to rearrange the presets list.
- Press and drag
- You can delete or save the current frequency to the presets list. ▶ See "Saving radio channels (Type2)."
- Radio broadcast information
- Can change the frequency.
- Shows information about the radio channel you are currently tuned in to.
- Use SoundHound to display the detailed information of the music that is now playing on the radio.
- To use the SoundHound service, subscribe to the Bluelink service. ▶ See "Subscribing to the service."
- Can turn on or off the split screen mode.
- The list of menu items appears.
- • Display Off: Turns off the screen. To switch the screen back on, press the screen or briefly press the power button (if equipped).
- • Station List: Can see the list of available radio stations.
- • Scan FM (Available only with FM): Select a broadcast of your choice after listening briefly to broadcasts from different radio stations.
- • Scan AM (Available only with AM): Select a broadcast of your choice after listening briefly to broadcasts from different radio stations.
- • Tune FM Manually (Available only with FM): Tune the radio frequency manually.
- • Tune AM Manually (Available only with AM): Tune the radio frequency manually.
- • Delete Presets: Can delete a registered channel from the presets list. ▶ See "Deleting a registered channel."
- • Reorder Presets: Rearrange the presets list.
- • SoundHound History: Can see recently searched music files through the SoundHound service (if equipped).
- To use the SoundHound service, subscribe to the Bluelink service. ▶ See "Subscribing to the service."
- • Radio Noise (Available only with FM): Customize sound quality when listening to radio by adjusting background noise of the original sound.
- • Sound Settings: Displays the system sound settings screen.
- • User's Manual on Web (QR Code): Displays the QR code that provides access to the online user manual for the system.
- • Split Screen: Can turn on or off the split screen mode.
- The screen may differ depending on the vehicle model and specifications.
- The broadcast station names and local information are displayed using GPS data. Those information may not appear when there is no GPS data received.
- The displayed broadcast station names may not match the actual ones.
- Press
 to add the music currently playing on the radio to Favorites.
- The icon is displayed on the radio screen only when you are subscribed to the Bluelink service.
- The icon is displayed on the radio screen only when the title and artist information of the music playing on the radio has been received by running a music search service.
- You can find the songs set as your favorites in the Liked Songs category under the USB Music list. The Liked Songs category will show only the songs with information that matches the music files in the connected USB storage device.
Changing the radio mode (Type1)
Perform any of the following methods:
- • On the Radio screen, press repeatedly.
- • On the control panel, press the button repeatedly.
The radio mode changes in the order of FM ▶ AM.
- The screen may differ depending on the vehicle model and specifications.
Changing the radio mode (Type2)
Perform any of the following methods:
- • On the Radio screen, press Radio Mode button repeatedly.
- • On the control panel, press the button repeatedly.
The radio mode changes in the order of FM ▶ AM.

- The screen may differ depending on the vehicle model and specifications.
Changing the radio channel (Type1)
Perform any of the following methods:
- • On the Radio screen, press the desired channel from the presets list.
- You can also change the channel by using the Move lever/button on the steering wheel.
- • On the control panel, press the
 or
or  button. You can move to the previous or next channel with good reception.
You can listen to the changed radio broadcast.
- If any Search knob on the control panel, you can also change the frequency by using the knob.
Using the scan function
You can listen to each broadcast briefly and select a desired one.
- On the Radio screen, press
 .
.Only the channels with good reception can be listened for 5 seconds in turn.
- The screen may differ depending on the vehicle model and specifications.
- When you find the desired broadcast, press .
You can continue listening to the scanned channel.
Changing the radio channel (Type2)
Perform any of the following methods:
- • On the Radio screen, press the desired channel from the presets list.
- You can also change the channel by using the Move lever/button on the steering wheel.
- • On the control panel, press the or button. You can move to the previous or next channel with good reception.
You can listen to the changed radio broadcast.
- If any Search knob on the control panel, you can also change the frequency by using the knob.
Using the scan function
You can listen to each broadcast briefly and select a desired one.
- On the Radio screen, press ▶ Scan FM/Scan AM.
Only the channels with good reception can be listened for 5 seconds in turn.
- When you find the desired broadcast, press
 .
.You can continue listening to the scanned channel.
Saving radio channels (Type1)
When you save the current playing channel in the preset list, you can easily select it later.
Perform any of the following methods:
- • While listening to a broadcast, press and hold an empty preset number with no channel on the radio screen.
- • While listening to a broadcast, press
 in the middle of the screen.
The current channel is added to the presets list.

- The screen may differ depending on the vehicle model and specifications.
- Press and hold a previously configured preset number to reassign it with the currently listening channel.
- You can register up to 40 channels.
Saving radio channels (Type2)
When you save the current playing channel in the preset list, you can easily select it later.
While listening to a broadcast, press  on the screen.
The current channel is added to the presets list.
- Alternatively, on the Radio screen, select ▶ Station List and press of the channel you want to save. The channel is saved to the preset list.
- You can register up to 24 channels.
- The screen may differ depending on the vehicle model and specifications.
Editing the radio channel list (Type1)
Changing the order of registered channels
- At the upper left of the Radio screen, press Menu ▶ Reorder Presets.
- On the presets list, press
 next to the channel you want to move, then drag it to reposition.
 - To complete the change, press
 .
.
The presets list is updated with the sequences changed.
Deleting a registered channel
- At the upper left of the Radio screen, press Menu ▶ Delete Presets.
- Select the channel to delete and press Delete ▶ Yes.
The channel is deleted and the preset number is emptied.
- When the current channel is already assigned to the presets list, press
 to remove the channel from the list.
Changing the number of channels to display on the preset list (if equipped)
- At the upper left of the Radio screen, press Menu ▶ Set Number of Presets.
- Select the number of channels to display on the preset list and then press OK.
The channels for the selected number appear on the preset list.
- When the number of channels is changed to a lower value, the channels for the number appear with removing others.
Editing the radio channel list (Type2)
Deleting a registered channel
- At the upper left of the Radio screen, press ▶ Delete Presets.
- Select the channel to delete and press Delete ▶ Yes.
The channel is deleted and the preset list is emptied.
- When the current channel is already assigned to the presets list, press
 to remove the channel from the list.


